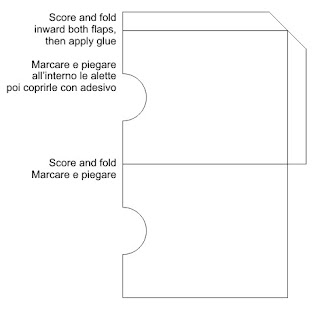
 Ho ricevuto alcuni messaggi in cui mi si chiedeva il template della custodia per ATC. Devo dare il giusto credito: ho trovato l'idea nel blog di Paula Ponders mentre cercavo su internet informazioni sulle ATC, che non avevo mai fatto. Non sapevo niente di niente, a parte che sono piccole (ho visto alcuni capolavori di Joan, tempo fa) e cercavo riferimenti precisi sulla misura e sulle eventuali "regole". In passato avevo già fatto piccole custodie del genere, solo che non ci pensavo più... (Herr Alzheimer in visita!).
Paula nel blog mostra diverse fotografie, con le misure accuratamente segnate,
 ma visto che sono pigra e non mi vengono mai due cose uguali se mi affido solo al righello, ho pensato di farmi il solito template con Corel.
Lo posto qui. Una volta scaricato dovrebbe essere a misura naturale, quindi potete stampare su cartoncino e ritagliare una copertina e il numero necessario di bustine. Consiglio di usare cartoncino per la copertina, e qualcosa di più sottile per le bustine interne. Con queste misure può ospitare 8/9 buste con le relative ATC (se sono sottili), altrimenti un po' meno.
Altro consiglio è di utilizzare, se l'avete, una fustella rotonda da 1" - 1-1/4" per ritagliare il cerchio che consente di afferrare l'ATC inserita. Altrimenti potete usare una fustella quadrata - come fa Paula - o dare due tagli angolati con una forbice. Provate anche altre fustelle...
Fatte le bustine, vanno attaccate l'una all'altra con un punto di cucitrice, e l'ultima va fatta aderire al fondo della copertina con biadesivo o colla forte.

I received requests for the ATC holder template I used. I must give credit: I found the idea in Paula Ponders's blog while I was looking for info about the ATC (it was my first try and I didn't know the exact size and rules). She has a lot of very nice photos, with very accurate measurements, but I can't rely on myself when it comes to draw something using just a ruler, so I made one of my Corel templates. I made something similar time ago, but I completely forgot about it (Senior moment...).
Here it is. Once downloaded and printed it should be of the right size, so you can print one cover and the number of envelopes you need. The size of spine I used can hold up to 8/9 envelopes with their ATC (if these last are thin ones). I suggest to use cardstock for the cover and thinner sheets for the inner envelopes. Another tip is to use a circle punch to cut out the finger hole. Paula, in her tutorial, used a square one to obtain a "V" shaped finger hole, but you can naturally use any kind of punch (I'm thinking of the little scalloped circle, or SU round tab punch...) or your faithful scissors.
Once the envelopes are made, staple them together and adhere the last one to the back cover using double stick adhesive or strong glue.

Grazie Dani, se sempre tropppo disponibile !!
RispondiEliminaGrazie!!!!! Sei gentilissima!!
RispondiEliminaGrazie! e complimenti per il blog!
RispondiEliminaMA CHE BELLO QUESTO PORTA ATC!!! NON HO MAI FATTO UNA ATC MA SE MAI DOVESSI INCOMINCIARE QUESTA è UN IDEA DA COPIARE SUBITO ;)
RispondiEliminaBY PALLINA
This is great!
RispondiEliminaVeramente un bel progettino!!!
RispondiEliminaBravissima!!
ooooooooo mi lasci sempre a bocca aperta con tutte queste idee splendidissime mi piace il modo in cui rendi disponibile anche per quelle imbranatelle tante istruzioni precise e chiare.
RispondiEliminaFANTASTIC IDEA!!!
RispondiEliminaLo ammetto ti ho scopiazzato! Complimenti per i tuoi magnifici lavori.
RispondiEliminaCiao ciao